
How to Share an RPR Report on Facebook

Reports that you create in RPR are meant to be shared! They’re perfect for agents who want to create topical messaging and results-orientated relationships through social media. RPR reports are an ideal option for agents who want to create enduring and results-oriented relationships through social media. But what reports are best for sharing?
Two of the most popular reports to share are:
- The Neighborhood Report
The report summarizes economic, housing, demographic and quality of life information about an area. - The Market Activity Report
The report presents a snapshot of changes in a local real estate market based on listing and MLS information, and includes active, pending, sold, expired, distressed, new for lease, and recently leased properties, as well as recent price changes and upcoming open houses for a period of up to six months.
Here’s a quick tutorial on how to share an RPR Report to Facebook:
- Begin by selecting the report type you’ll be sharing

- Next, choose the plus “+” symbol to customize the report as needed.

- Now select Run Report to generate the report.

- Now scroll up, in the My Reports section, click the dropdown.

- Choose the “Post on Facebook”
- For agents in “non-disclosure” states, be aware of rules prohibiting sharing certain property information.
- Now choose where to share the report: your profile, a page or group.
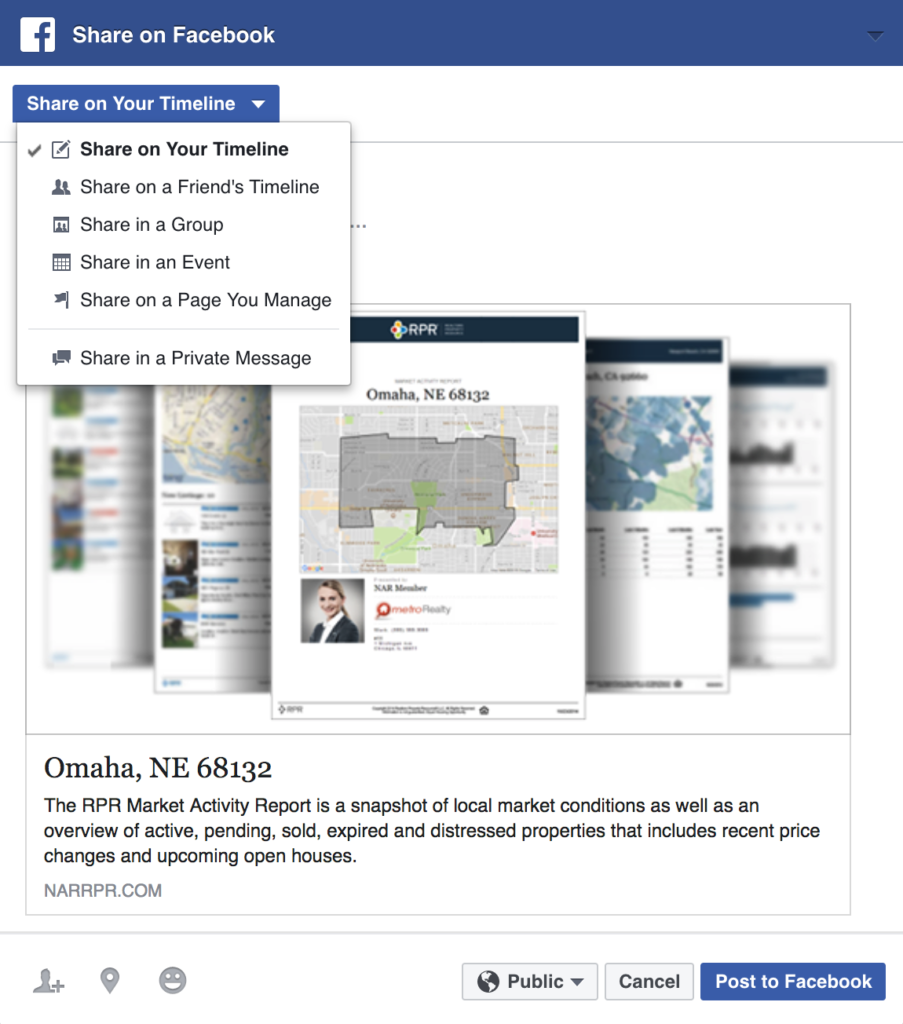
- Choose who can see your shared Report. Then select Post to Facebook.

Share This Story, Choose Your Platform!
Related Posts


2 Comments
Leave A Comment
TOPICS
Announcement
Broker Tools
Buyer
Canva
CMA
Custom Pages
Data Layers
Data Share
Decoding Real Estate
Deep Link
Digital Marketing
Facebook
Farming
Integration
Lead Generation
Learning
Listing Presentation
Mailing Labels
Map
Market Activity
Market Trends
Neighborhood
New User
Open House
Opportunity Zones
Partners
POIs
Popular KB
Property Details
Prospecting
Quick Tips
Refine Value
Release Notes
Report
RPR app
RVM
School
Search
Seller
Site Selection
Social Media
Trade Area
Valuate
What’s New
Wow Factor
AUDIENCE
CATEGORIES


TUTORIALS & GUIDES
SUCCESS STORIES
PROSPECTING
THE PODCAST

What’s the cost for this. Thank you
RPR is 100% included in NAR fees. There is no additional cost.